Friday, November 18, 2011

Cookies!

 Our office has an annual cookie party and I decided to participate this year.  I did two different versions of two different cookies, both of which I found over on the web (yes, through pinterest).  The first was lemon pecan shortbread .  I made the dough the night before and then rolled it into a 1-1/2 inch diameter log and put it in the refrigerator overnight.  The next day, I sliced the roll into 1/2 inch thick cookies and baked them.  I didn't roll the dough and cut shapes as the recipe called for because I didn't have the patience.  This morning, I melted some dark chocolate kisses (used for my other cookies, added a little cream and then some warm water to get the consistency I wanted and drizzled it over the cookies.  In another bowl, I mixed about a cup of confectioner sugar, a tablespoon of cream and the juice from one lemon to make a glaze. I drizzled that over the other half of the cookies.  While I found the cookies a little dry, the drizzle helped.  And coffee helped even more.  Next time I might cut back on the flour a bit.

For my next trick, I made  pretzel hugs . This is really more of a construction project than a recipe because there isn't much baking involved. You buy some Snyder's Snaps Pretzels and some Hershey kisses.  I bought the dark chocolate kisses and the milk chocolate with caramel kisses. Lay the pretzels in rows on a waxed paper or parchment covered baking sheet and top each pretzel with a kiss.  Put them in a 300 degree oven for about 2 1/2 minutes.  Do a test batch first.  You don't want the kisses to melt but you want them 'squishy'.
Remove the pretzels from the oven and top with another pretzel.  The instructions say to wait a minute but I don't know if that helps or not.  I'm impatient and I put pretzels on top pretty quickly.  The dark chocolate came out looking pretty. As you can see by the picture on the left, the caramel ones got a little sticky.  Sticky but delicious!  I liked both versions but the caramel was the best, in my opinion. 

I thought the pretzel cookies would be an easy way for me to bring something but not spend too much time baking.  As it turns out, opening all the kisses, lining up the pretzels and watching over them for two minutes makes this one a little tedious.  But worth the effort.

Wednesday, November 9, 2011

Cauliflower Pizza Crust and More

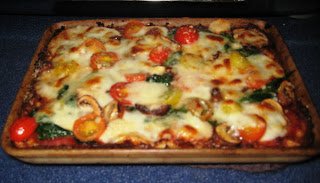
I already liked cauliflower so I was ready to try cauliflower pizza crust as as soon as I saw it here.  I think even people who don't like cauliflower would like this crust because it is all cheesy goodness.  I baked my crust and then topped it with TJ's pizza sauce, some cooked mushrooms, cooked spinach and uncooked grape tomatoes.   I sprinkled some more mozzarella and a little grated Parmesan on top and broiled it for about 5 minutes. Just long enough to melt the cheese.  It was so good.  While I was exploring the web for more on cauliflower rice, I found this site.  The recipe there uses egg white instead of whole egg.  I've tried it both ways and I prefer the version with the egg yolk included.  I do use less cheese and egg than either site. Approximately half the cheese and only enough egg to hold everything together. 

The basis of cauliflower pizza crust is cauliflower rice.  Cauliflower rice is just grated (or food processed) cauliflower that has been seasoned to taste and sauteed in olive oil until it is tender.  I liked the recipe at the Secret Life of Cauliflower site that has the alternate pizza crust recipe.   I could eat bowls of this rice in one sitting but, as I mentioned, I like cauliflower.  Next time I make it I will brown it more.  At least when I plan to have it as rice.  Future plans include serving it as a side and also using it to make fried rice.  The pizza crust recipes say to skip the oil and seasonings when making the rice for crust but I ignored that and used my spicy rice in the crust mixture.

This is what my pizza 'crust' looked like before I put the toppings on it.  It looked good enough to eat plain and so tonight I made a new batch and, as suggested by the Secret Life site, made 'bread sticks'.  I just shaped the mixture into sticks on the baking pan.  I dipped them in the left over pizza sauce.   Very yummy!  I could just slice the pan of dough into sticks but then I wouldn't have enough crispy edges.  Next time I will flip the sticks to get some more browning.  I'll also use parchment to prevent sticking.  I predict cauliflower sticks will be cooked a lot at my house.  That and cauliflower rice.  And pizza.  And, oh yeah, I learned about cauliflower pizza crust on, you guessed it, pinterest.com. :-)

Monday, November 7, 2011

Crispy Shrimp AND Lemon Pull Apart Bread

This past weekend, I cooked two recipes I found over on Pinterest.com (if you want an invite just let me know).  The first was Crispy Shrimp Pasta, pictured to the left.  I used wheat rotelle from Trader Joe's but otherwise followed the recipe.  The shrimp was yummy and I ate several while I was finishing up the sauce for the pasta.  The sauce was also good, though I think I'll spice it up more in the future.  I also thought the sauce was a little thin.  The recipe says to add some cornstarch and water if you're not happy with the consistency.  I added the cornstarch and still thought the sauce was thin.  It did thicken up after it sat for a bit but I still think next time I'll see if I can't thicken the sauce a little more before adding the pasta.

For dessert I made Lemon Pull Apart Bread.  I loved this recipe and it will become a standard.  It was really pretty simple to make.  I made the dough Saturday night and baked the bread on Sunday.  Simply roll out the dough, butter it, and sprinkle on lemon/orange sugar. Then cut long strips which you stack and then cut again to make squares.  Put the squares in the pan and bake.  When it's done, pour a lemon glaze on and then try not to eat it all in one sitting.  I controlled myself and had a small piece Sunday and took the remaining loaf to work.  It went pretty quickly so I was limited to one good slice for breakfast with my coffee.  This bread is probably more a coffee cake rather than a dessert but I'd be happy with it as either. It is just slightly sweet with just the right amount of lemon flavor.  YUM!!

Thursday, November 3, 2011

Fennel, Potatoes and Butter - UPDATED

My first course tonight was fennel roasted with butter and Parmesan cheese.  I got the recipe from the same Chef Boyardee book I got the Italian Potato Salad from.  I've never cooked fennel before, though I believe I have had it in salads.  For this dish, quarter the fennel and steam it or microwave it until tender; it is tender enough when you can easily push a knife into it.  Place the cooked fennel in an oven safe pan and pour some melted butter over it - I used about 2 tablespoons for one fennel bulb.  Sprinkle a tablespoon (or more) of Parmesan over the pieces. Cook the fennel in a 350 degree oven for 25 minutes or until brown.  I turned the fennel once during the cooking, since the fennel was getting browned on the bottom but not the top.  I thought this was quite tasty.  Fennel has a slight anise (licorice) aroma but I didn't think it tasted like licorice.  I would describe it as a cross between celery and sweet onion. UPDATE: I found another recipe here that looks even better.  Fennel would go great with meat or fish.  But I didn't have either.  Instead, for my second course:

I roasted these Dutch Yellow potatoes.  I found the recipe on my new favorite site Pinterest. You cook the potatoes (I microwaved them) and then make thin slices without cutting all the way through.  Drizzle some olive oil and butter over them and add salt and pepper.  Next time I will try to separate the pieces a bit before the drizzle so more butter/oil and salt get in between them.   Roast them at 425 degrees for 40 minutes or until they are nice and brown with crispy edges.  These would also go well with meat or fish but I ate mine accompanied with Crème fraîche and tobiko and it looked like this:

And it tasted great! 

Tuesday, November 1, 2011

Italian Potato salad

I made this Italian Potato Salad last weekend and thought it was quite yummy.  It tastes best warm or at room temperature.  I had it for lunch and then had some of the leftovers the next day.  I don't recommend it when it is cold, like you would eat typical mayonnaise based potato salad.


This recipe is adapted from Delicious Memories: Recipes and Stories From the Chef Boyardee Family  which I discovered at the Senior Library while I was working.  I picked it up because I just didn't think recipes for Chef Boyardee canned food could be interesting, let alone good tasting.  But I was very wrong.  The book shares many family recipes and, while the translation to canned food might not appeal, the home made versions seem delicious.  I will be trying several of them.


Italian Potato Salad

1 lb red potatoes   (or new potatoes or Yukon gold, whatever you like)
¼ C olive oil
1 clove garlic, minced
1T wine vinegar
4 T finely chopped carrot. (I used the large side of my grater)
1T chopped Italian parsley
Salt and pepper to taste
Cook the potatoes in salt water until tender.  While potatoes cook mix the remaining ingredients together and let sit.  When potatoes are cooked and still hot, cut them into chunks and mix with oil mixture.  Add a little more olive oil if necessary – the potatoes can soak it up.  Serve warm.